


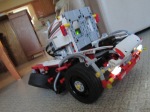
Quality is the whole concept of my new robot truck. S3miTruck was modeled after the US long-nose semi trucks, or if you prefer, “big-rig”. It features a color sensor that acts as a rear taillight/warning light, LED headlights, a linear-actuated extendable bumper, a switch, remote-control capabilities, RearWheelDrive, and so much more. It took about 9 hours to build and weighs ~3 lb. The Power Functions system (PF for short) has been incorporated into S3miTruck.


S3miTruck has PF lights, and they are LED; they act as S3miTruck’s headlights. You may complain about the added weight (it weighs ~3 lb. :P), but I felt like adding a touch of reality. You will see that the Power Function battery box is located in the cabin, behind the windshield and in front of the EV3 Brick. At first, I just left the actual lights that light up as it was, but it looked funny with just a light shining through a one stud opening. So I exercised my studded LEGO building skills 😀 I think the headlights are creative; they fit perfectly! Moreover, it sort of lights up the whole clear pieces.


Another function of S3miTruck thanks to the Power Function system: the Linear Actuated Extendable Bumper! A PF Medium Motor is mounted between the 2 rear Large Motors that drive the truck. The Medium Motor drives a small linear actuator. A linear actuator uses internal gearing to extend and/or retract the central structure via driving the input forward or backward. This is just unique to me; I thought it was a cool function to add since it was economical to make use of the extra PF motor for something since the PF battery box already added sufficient weight to the model. Anyways, when the PF battery box is turned on (it remains on when playing with it), the LED lights are always on, but the bumper only works when you turn the dial of the switch toward the corresponding direction.


It drives with two large motors: RWD. It turns smoothly without the differential half-the-time with some advanced programing (well, more advanced than usual). When it turns, it provides more power to one motor than the other. For example, when turning right, it provided more power to the left wheel than the right. It steers using a Technic rack.


I included many details on S3miTruck! They included but are not limited to: grille, flowing curves, side mirrors, pop-out doors, smoke stacks, fog lights, etc.


-
- After Crash Test


And here is where I conclude my project. This has got to be one of my biggest projects ever (excluding GrandPrixRac3r). I am fairly pleased with it. Here is me with my new classy convertible! I’m also programming S3miTruck (with a LEGO computer…?). I don’t know why, but when I was getting ready to break it up, I performed a very intense crash test. 😛

Looks pretty cool! Do you have any lego system parts such as plates? If you plated your models they would look better and you can add smaller details – you should try it, I think MSEP does it 🙂
LikeLike
Thank you! I believe I do have Technic plates – if you mean the four flat black panels on S3miTruck’s sides. If you mean System base plates, yes – I have two green ones.
LikeLike
Oh right – I meant System plates. It might be worth investing in some system Lego as they really help to tidy up your model and add interest. Check out bricklink and brickowl for buying individual Lego parts.
LikeLike